|

|
|||
|
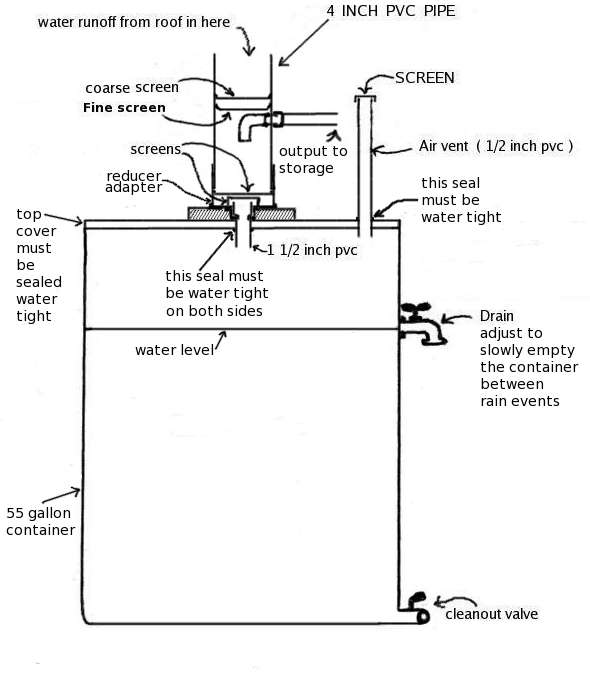 A new version of this first flush diverter and a demonstration video can be found here. The idea of a first flush diverter is to keep the most polluted flow of water out of a rain water harvesting system. Most small systems take water from a roof surface. Dust, organic material, bacteria and air pollution particles build up on a roof surface during a dry spell. A month without rain will allow significant amounts of pollutants to settle on a roof. Water is one of the best solvents known to man. Because of this, the first flow from rain after a dry spell will contain concentrated poisons dissolved in the rainwater as it flows across the roof surface, or any impervious surface. Roads and parking lots accumulate even more poisions than roof surfaces. A first flush diverter prevents the first 15 or 20 gallons of toxic water from entering the storage system by diverting it into a temporary holding area and then allowing only the cleaner water to flow into the storage system. The recommended minimum amount of diversion is 1 gallon per 100 square feet of roof surface - this diverter is set for about 2 gallons per 100 square feet. How it works: New (November 11 2009): The output pipe has been changed to inch-and-a-half pipe; it was 3/4 inch. The 3/4 inch was way too small for moderate to heavy rainfall events. The diverter will now take up to 24 liters per minute without overflowing. Water from the downspout enters the 4 inch pvc pipe and flows directly into the 55 gallon container. As the pre-set space in the 55 gallon container fills; the air vent allows the air inside to escape while the water flowing in displaces it. If there were no vent much of the water would back up and flow into the system before the barrel filled completely during moderate rain-fall events. When the 15 gallon space in the barrel becomes full; the water fills the 4 inch pvc pipe on top until it flows out the pipe on the side. As long as the air vent is higher than the outlet; water will flow out the side pipe. If the air vent leaks or is not "above" the water output the water will just flow out the vent. By the time 15 gallons of water has run off the roof most of the build-up of dust, and organic decaying matter has been washed off the roof surface and is held in the 55 gallon container. The faucet is set to drip slowly enough to allow the 55 gallon container to fill but also allow the 55 gallon container to empty after the rain stops. A 90 degree fitting attached to the output pipe pointing downward on the inside of the 4 inch pvc (added July 2008), keeps all of the first flush water out of the system. It is important to note that this first flush diverter will reduce, BUT NOT ELIMINATE, disease causing organisms and harmful chemicals from roofwater. Water runoff from a roof can contain many different kinds of substances.Some roof surfaces can produce water that is very safe, while other types of surfaces can produce poisionous water. Also, please note that this design may not work in areas where rainfall is extremely heavy (more than several inches per hour) - the pipes are not of sufficient diameter to carry the resulting flow of water. A good explantion of roof water quality can be found here. If there is some question as to whether or not bacteria will build up in the water that does not drain regularly and spill over into the cleaner output water; note that after 6 months of operation the water from the diverter contained significantly less coliform bacteria - 82 percent less. The tests shown on this site demonstrate this quite clearly. Even with this, since there is no physical seal when the temporary storage fills up during a rain event, it would be a good idea to completely drain and clean out the 55 gallon container at least twice a year (easily done by opening the cleanout valve). The diverter with the wooden top was sealed with silicone I. All the input and output openings must be sealed or the device will leak. (You might ask why that silly looking air vent with the little hat-like thing on it? Do I really need that? The answer is yes you do. Since the barrel is air tight - without a vent in the top it won't fill correctly. The vent must be higher than your output or the water will simply pour out the vent and never even make it to your output pipe - and the air vent must be sealed where it goes into the wood top. Also a screen over the air vent is a must to keep out mosquitoes and larger objects that might plug it up.The thing works and works well - and its disgard flow rate is easily adjustable.) It has no moving parts (exept the faucet) and nothing to wear out except the screens - if they are stainless steel they will last many years. Set the faucet to drip slowly enough to allow the water to empty between rain periods. I set the rate by watching the water drip out of the downspout after the rain had stopped and the flow from the downspout was typical of what occurs during a very light drizzle, and then set the faucet to approximately the same "drip" rate. In 3 or four days the water level in the 50 gallon container will be down 15 gallons. When any significant rainfall occurs 15 gallons of water will be discarded before any enters the filter with this design. If there is only a light drizzle which is not enough to "wash" the roof none of the water goes into the filter, you don't want it anyway because it has roof chemicals and dissolved dust in it. Where you put the drain faucet will determine how much water is discarded before it is allowed to enter the filter system. If you want to use the disgarded roof water for utility purposes like washing your car or outdoor cleaning you can have the faucet drain into a small container that allows the excess water to fill another storage container. This design is adapted to the rainfall in this area which is usually not concentrated and heavy, but light and continuous. If you live in an area where there are periods of very heavy rainfall, you will probably want to include an overflow pipe on the 4 inch input, otherwise the water will flow over the top of the diverter. Also the ouput to your filter or temporary storage may need to be a larger diameter than what is shown in the pictures above.At first, I used a recycled container and built the top from cedar scraps. The sealant was seven dollars, the pipes were ten dollars, the wood ten dollars and the faucets seven dollars. Most commercially available diverters are expensive and have many things that can go wrong. One example of a common problem is when the flow through the diverter becomes blocked by leaves and/or other organic particles. The cleaning process should be very quick and simple. This diverter is very easy to clean. The screens stop nearly all of the debris and the reset drain does not plug up and can be easliy and quickly adjusted, (or replaced with another faucet for about 7 dollars) and the disgarded water can be used for utility purposes. To use the diverter shown here you don't even need to do any thing to the roof gutter, in fact you would not even need to go up on the roof to set one of these up. The one shown here works just fine and could be made to look much better with a little paint. (2009-08-25) A different barrel with a sealed top is now being used. The silicone seal is not easy to keep tight as the wood expands and contracts with varying moisture content and the silicon has cracked several times, and in freezing weather the entire wood top has been broken loose. Cleaning out the screens takes about 5 minutes, and with a drain on the bottom the inside of the barrel can also be cleaned out and all you have to do is open the faucet on the very bottom and let it drain till it is empty - all the muck inside drains out the bottom. 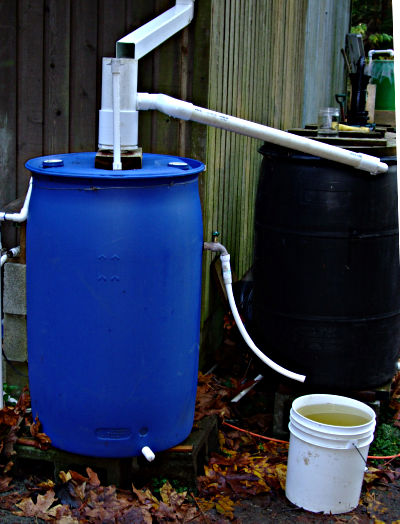 First flow diverter picture. Note the output pipe has been changed to inch-and-a-half diameter pipe (as of November 11 2009). This allows much more water to flow into storage. This system was tested and will take 24 liters per minute of flow. A person might ask: Why use a diverter, I thought rainwater was pure? I look at the water from my roof and it is perfectly clear and looks good. Whats up with this diverter thing? Rainwater is not pure - anymore; although it may be much cleaner in non-industrialized areas. Any pollution that rises into the upper atmosphere where clouds form will be present at times (depending on the wind velocity and direction) in the rainwater collected from your roof Since upper atmospheric winds can bring pollution from thousands of miles away (even from the other side of the earth).1,2 (back to introduction) There is virtually nowhere on earth, now, where rainwater is "pure" in the sense of free from man made substances. Any surface water will contain man made pollutants, even water taken from reservoirs used for public water supply systems. Many of these pollutants, particularly heavy metals like lead and mercury, build up in soil and water - including the water in reservoirs that supply water to millions of people. But more importantly; any smoke, dust, vehicle exhuast, soot, or contaminated water vapour that is released into the "air" near your roof will also be in the water collected from your roof, but most likely in far higher concentrations than the pollution from thousands of miles away - unless your roof is many miles away from any large city or coal fired power plant. All this poison collects on any surface including your roof. The sun heats up your roof and the poisons that are on it, producing many more poisonous compounds. The upside to this whole thing is that water is a wonderful solvent. As the first rain after a dry spell hits your roof much of this pollution is washed off the surface of the roof. This tainted water will also flow into your filter - that is unless you have a diverter to force the most polluted part of the water away from your system. That is what the first flush (or first flow) diverter does. It allows the most polluted water to be disgarded in favor of the far less polluted water that runs off the washed surface. The downside to all this is that from millions of square feet (probalby more like tens of billions of square feet - the previous link here shows 163 million square feet of impervious surface in one county in one state in the U.S. over ten years ago) of impervious surfaces including roofs, blacktop(roads and freeways loaded with tire dust and oil) and cement, runs all the pollution we produce that can be picked up by water - which is most. In most cases this runoff goes directly into rivers, streams, and eventually the ocean. One advantage of collecting water from your roof is that you dont get the oil that comes from automobiles and trucks on the highway, and less of the tire dust. (Did you ever wonder where the tread on the tires of your car goes as they wear? or how many tons of that tire dust goes into the air and water near your house?) Another advantage is that by collecting and temporarily storing roof water, particularly in urban areas, much of the surge of storm water is held back reducing the flow of storm water into streams, rivers, and lakes, thereby reducing the quantity of pollution flowing into the surrounding bodies of water (fast flowing overfilled streams and rivers break up soil and pick up more pollutants than non turbulent waters). In many areas, pollution from storm water is a major problem and is destroying ecosystems, killing fish, and making people sick. My point here is twofold: use a diverter; and THINK. Think very carefully about what is being put into the water our grandchildren will eventually drink. Think about participation in non-sustainable activities which give you your "comforts", yet produce many carcinogenic chemicals that bio-accumulate in plants and people. Try to understand that the same science that has given us all our modern conveniences including increased food production, advanced medical care, and thousands of consumer products is now telling us about the true cost of these things: the health issues due to toxic man made chemicals just about everywhere on earth. You will definately want a screen in the diverter input: 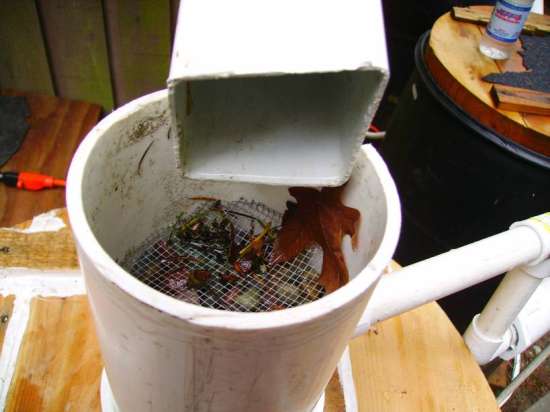 |
 
|
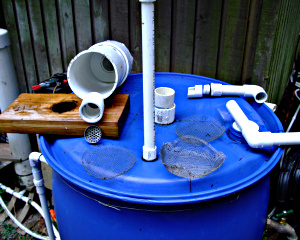 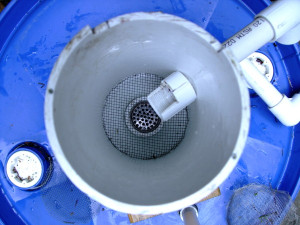 Inside view of the 4 inch pvc 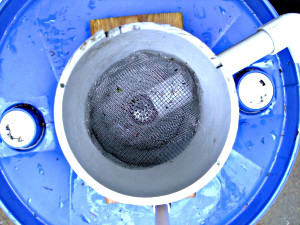 Inside view of the 4 inch pvc with 90 degree fitting and screens installed (the 4 inch pvc can be filled with pea gravel but it is more difficult to clean) Below is shown how to convert a 55 gallon barrel (with a top already included) into a first flush diverter: 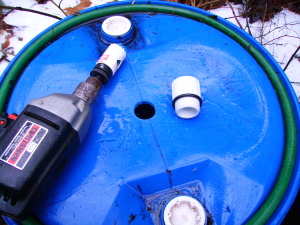 The container must be air tight (water tight - make sure the two original threaded caps are sealed tightly - wrap the threads with plumbers tape and tighten them down securely). Use a pvc male adapter for the water input (a 1 1/4 inch is shown here but a 1 1/2 inch has the same thread size and will handle more flow). A 1 1/2 inch hole saw will make a hole almost the right size for the male adapter threads. The "o" ring is there to provide a seal. Also use "teflon tape" often called "plumbers tape" to seal the threads on the adapter. 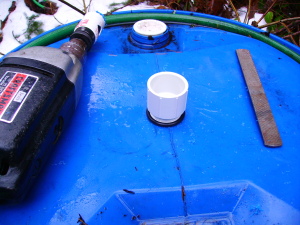 The hole will need to be slightly enlarged to make the pvc male adapter "thread" into the hole. This is a bit tricky. I used the "fine" section of a half-round wood rasp to SLIGHTLY enlarge the hole after drilling it with the 1 1/2 inch hole saw. If you have ever used a tap you will understand that the pilot hole cannot be too big or the whole thing is ruined. Take it slow and only file a very slight amount. It will take some forceful pushing to tap the plastic hole with the pvc adapter but it does work. Be careful so the file is not dropped into the barrel! 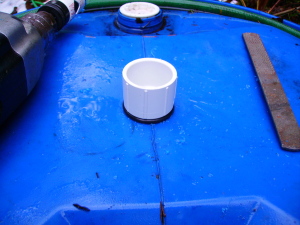 This shows the adapter installed. Make sure it is tight. The 4 inch pvc assembly shown in the wood top version is used here. Connect it with 1 1/2 inch pvc pipe. I would suggest gluing one of the connections between the input and the pvc adapter.  This shows the input (the same input that is shown in the wood top version) installed with a 2X6 support between the base and the top of the barrel. The vent is installed using a 1/2 inch male adapter and the hole to thread that in is drilled with a 3/4 inch spade bit. The drain faucet is installed the same way the vent is installed. The 3/4 inch spade bit drills a hole just the right size to "tap" the threads of a 1/2 inch faucet into the plastic barrel. Be sure to use an o ring washer and plumbers tape to insure a good seal. I have tested this and it works. The output on the side of the 4 inch pvc should be several inches higher if used in areas where very heavy rainfall occurs - and remember that the vent must be higher than the output. (it works fine here where rainfall is very seldom heavy) This will divert up to 55 gallons of water depending on where the "Drain" faucet (see drawing) is installed. This one is set up to divert 20 gallons. I used an electric drill but this could all be done without the use of any electricty with a brace and bit. The barrel cost 35 dollars, and the pvc pipe, o rings, screen material, and fittings were under 20 dollars. Some paint would make the whole thing look much better - still way under 100 dollars. Be sure the diverter is drained if freezing weather is anticipated Below are pictures of rain water runoff from a composition roof shown at different stages of filtering. This roof holds moss, leaves, and fir tree needles in abundance. Each picture is of different water using the same container. This same comparison is very different if the water is viewed in a smaller glass container (see below). 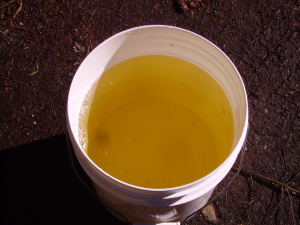 Water straight from the downspout (downspout water). 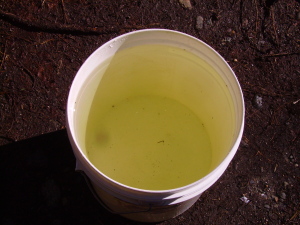 Water to be filtered. This is from the diverter output (diverter water). 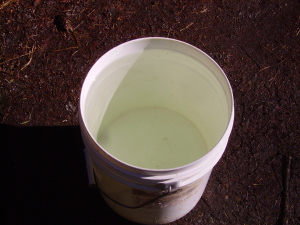 Water from the diverter output after being run through the slow sand filter (filtered water).  (downspout water). 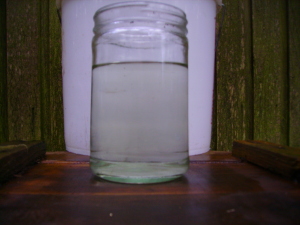 (diverter water). 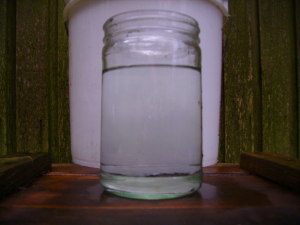 (filtered water). |
||
|
1.
Export of atmospheric mercury from Asia.
Daniel Jaffe, Eric Prestbob, Phil Swartzendruber, Peter Weiss-Penzias,
Shungo Katoc, Akinori Takamid, Shiro Hatakeyamad, Yoshizumi Kajiic; Interdisciplinary Arts and Sciences, University of Washington-Bothell, Bothell, WA 98011 8246, USA. Atmospheric Environment 39 (2005) 3029-3038. Received 11 October 2004; accepted 2 January 2005. (available online at www.sciencedirect.com) 2. Long-range transport of Siberian biomass burning emissions and impact on surface ozone in western North America. Dan Jaffe,1 Isaac Bertschi,1 Lyatt Jaegle,2 Paul Novelli,3 Jeffrey S. Reid,4 ´ Hiroshi Tanimoto,5 Roxanne Vingarzan,6 and Douglas L. Westphal4. GEOPHYSICAL RESEARCH LETTERS, VOL. 31, L16106, doi:10.1029/2004GL020093, 2004 Received 26 March 2004; revised 12 June 2004; accepted 19 July 2004; published 20 August 2004. back |
|
|

This work is licensed under a Creative Commons Attribution-ShareAlike 2.5 License. terms of use